Classroom Setup
- Every classroom on campus has a new webcam and tripod setup that was installed during the Summer of 2020
- These webcams are 1080p HD webcams with a built-in microphone and autofocus for video.
- The webcams are installed on tripods and secured to furniture in each classroom to ensure they are not stolen or misplaced.
- Webcams are for front-of-room lecture capture, and can be used as document cameras as well.
- Note: For capturing what is written on the whiteboard/chalkboard in the classroom, moving the webcam close to the board (and writing legibly) is recommended to ensure that remote students can easily read the text on the board on their smaller computer screen
- These webcams are USB plug-and-play, and can be used on personal laptops also instead of the classroom computer.
Hosting a Zoom Meeting in the Classroom
- Log-in to the computer like usual, and click on the Zoom icon on the desktop.
-
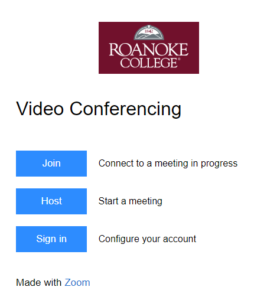
- This will open the official Roanoke College Zoom website (this can also be reached at Roanoke-edu.zoom.us)
2. From there select Host to start a meeting, and sign in using your Roanoke College account login information (NOT THE SAME LOGIN INFO AS PERSONAL ZOOM ACCOUNT). We recommend that your personal Zoom account and your Roanoke College account do not use the same password for enhanced security.
3. Once logged in a file will download. Click/open that file. This file will launch Zoom on the computer and the meeting will begin.
4. Once the App launches, a screen will come up asking to Join with Computer Audio. Select that option and you will join the meeting using the new webcams in the classroom.
NOTE: If you have set up Zoom meetings in advance using your RC email / Zoom account, you can select the Sign In option instead of Host , and launch your meetings from the Zoom web interface. Using the “meetings” tab you can then view and launch any meetings associated with your college Zoom account.
Configuring provided Webcam Audio/Video : 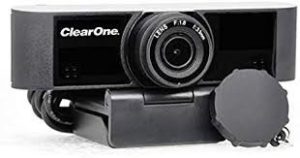
Before using the webcam, make sure to check that the lens cap is not on!
- When in the meeting, ensure the correct webcam is being used in Zoom by selecting the arrow next to the Stop Video option
2. From there select Video Settings. This will open the Settings Menu for Zoom where you can select different available microphone and camera options.
3. To use the tripod webcam/mic:
-
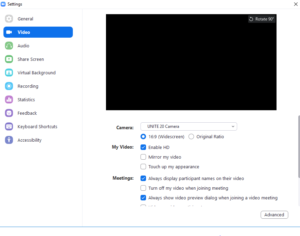
- Ensure that all the video settings are set correctly, with the UNITE 20 Camera as the default option
- Ensure HD video is enabled, and importantly check that the option to mirror video is NOT checked so that text is not reversed for all Zoom participants.
- Ensure that the Microphone is set to Microphone (UNITE 20 Camera).
4. See picture below and match with your settings to ensure the correct settings are applied.
5. If you are connecting the classroom webcam to your personal laptop via the Blue USB cable that was connected to the classroom PC, please ensure the settings are the same as picture above.
6. As a courtesy to others, remember to plug the blue USB cable back into the classroom computer when you are finished using it with your laptop.
7. Now the Audio and Video settings are correctly configured, be sure to test the audio and video and ask Zoom Attendees if they can hear and see you before starting class.
Other Audio/Video options may be similarly set if using outside technology not provided by IT.
Sharing Content with Zoom Attendees :
- If you are planning on showing some form of media to both in-person and online participants, then you can use the Screen Share
- Note: Do not try to use the webcam to share what is being presented on the projector/TV, Zoom can do this for you with relative ease with screen share.
- Please be aware that it’s not possible to share media that is being played through the installed VHS/DVD combination players still found in certain classrooms as it is not a source that you can access through the Computer that is hosting the Zoom session. The same can be said for Document capture devices found in certain classrooms.
- If using a DVD or Blu-ray for class use the DVD player connected to the computer for sharing DVD/Blu-ray content with Zoom attendees.
- To start screen share hover the bottom taskbar in the Zoom meeting and select the Share Screen icon (which should be Green).
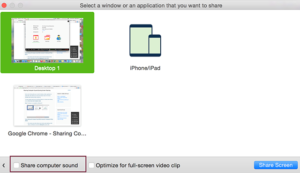
5. In the Share Screen window select the screen you want to share with Zoom attendees. You can choose to either share the whole screen, or just the screen of a single application (such as Firefox or Chrome for a YouTube Video, VLC media player for DVD and Blu-Ray options, or PowerPoint for Presentations).
6. If sharing video/audio content with Zoom Attendees you MUST select the box in the lower left corner titled Share Computer Sound.
7. The Pause Share option pauses the screen for Zoom attendees in situations where they should not see what the host is doing on screen.
8. The Annotate option allows the host to write over the screen using the mouse cursor, which can be really handy when trying to highlight important information in a presentation, video, Word/PowerPoint document, or website.
9. When done sharing your desired screen select the Stop Share option highlighted in Red at the top of your screen.
Recording Zoom Sessions :
- Zoom allows users to record their Zoom sessions and that can be selected by choosing the Record option in the lower taskbar of the Zoom App.
2. When you select the record option it will ask where you want to record the Zoom session. If you want to record your session please do this at the START of your Zoom meeting.
3. From the two options it is highly recommended to select Record to the Cloud. This will record the session directly to your online Zoom account, instead of the computer hard drive.
4. Once the recorded session is ready for viewing you can find the recording by going to the Roanoke College Zoom login page (Roanoke-edu.zoom.us) and choosing the SIGN IN option to access your account. Remember to sign in with your Roanoke College account information (NOT personal Zoom account information).
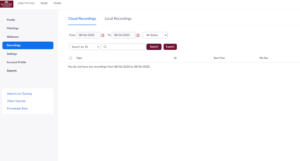
5. Once you sign in, look to the left and you will see various options to choose, select Recordings.
6. In the Recordings tab of your profile you can view all Zoom sessions you have recorded and can access links to share with students or others.
7. The links can be made available directly on Inquire or can be emailed to students using share links.
8. For sharing the recorded session with students or others, select the Share option.
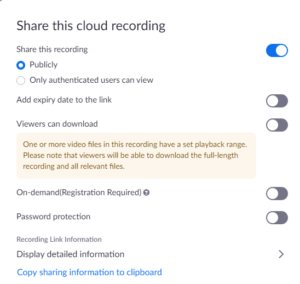
9. From there a window will open with options for sharing the recorded session. Ensure that the options are set correctly such as sharing publicly, allow viewers to download, password protection is optional but recommended.
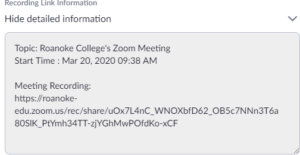
10. To find the actual link for the recorded session select Display Detailed Information to see the link to the recorded session
11. To make things easy, select “Copy sharing information to clipboard” and this will copy the link for the recording to your clipboard, and can then be pasted (Ctrl + V) in your email or Inquire post.
12. You can also add your Zoom sessions to inquire classes directly using the zoom activity add-in within your inquire page.
Disability accommodation and considerations for recorded content posted/shared online:
- For students with certain disabilities, captioning and a transcript may be required for video content posted online for class purposes.
- All public-facing content posted to any official college website or social media account should be captioned.
- e. a public lecture recording that is available to the whole RC community should be captioned. A single class recording that is only shared with a select group of students in a class may not be REQUIRED if no students have a registered disability, but is still recommended.
- If captioning and transcription are required for a student in your class, please contact the Center for Learning and Teaching for specific information, as captioning is NO longer done in-house by ITRC and has been outsourced.

