
VPN Instructions for Mac
Downloading FortiNet VPN for MacOS
Step 1: Instructions on how to reach the download page here
Step 2: This will start a download on the right-hand side of your dock. Click the download to open.
Step 3: Double-click the cardboard box to Install

Step 4: This will open an installation wizard. Click Continue > Continue > Agree > Install

Step 5: You will be prompted to enter in the password for your Mac
Step 6: After the Installation is Successful screen, you can close the window and click Move to Trash when prompted.
Connecting to FortiClient VPN
Step 1: Open Finder, and click Applications on the left side
Step 2: Look for FortiClient in the list

Step 3: Double-click to Open > check the box next to the acknowledgement > click I accept
Step 4: Click Configure VPN
Step 5: Leave SSL-VPN selected at the top and fill in the following areas:
Connection Name: Give your connection a name and description (ex. Roanoke VPN).
Remote Gateway: vpn.roanoke.edu
Note: For computer science students, enter vpn.roanoke.edu/cs
Check the box: Enable Single Sign On (SSO) for VPN Tunnel
Click Save.

Step 5: You will be redirected to the VPN Login Screen. Click SAML Login

Step 6: You will be redirected to the Office 365 login page.
Enter your full RC email and password > Approve your MFA > Connect to VPN.
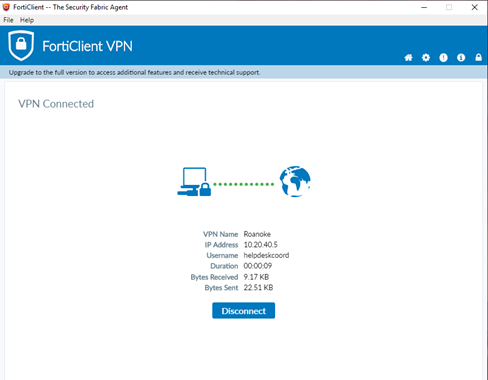
Step 7: Click Disconnect when you are ready to end your VPN session.
Possible Additional Steps
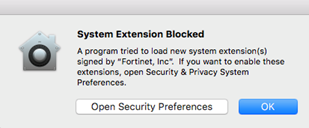
Step 10: If this box appears, Open Security Preferences
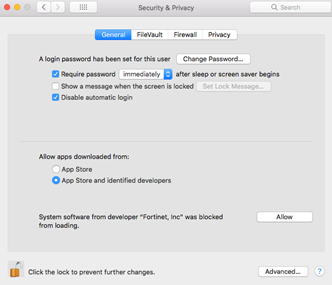
Step 11: In Security & Privacy > Click the lock in lower left to unlock the page
Step 12: Sign in with your Mac password
Step 13: Click Allow in the lower right corner of the window
Step 14: Re-lock the screen
Step 15: Return to the VPN page and it should show that you are connected
 Click Disconnect once you are ready to end the VPN session