
Add Regular & Ad Hoc Appointment Summary Reports
Documenting a Student Interaction
Summary Reports can be created during or after meeting with students. You can add a summary report to an
appointment scheduled in advance, create a summary report for a walk-in appointment, mark a student as a no
show, or edit existing summary reports.
For Scheduled Appointments: There are several different ways to create an Appointment Summary Report for
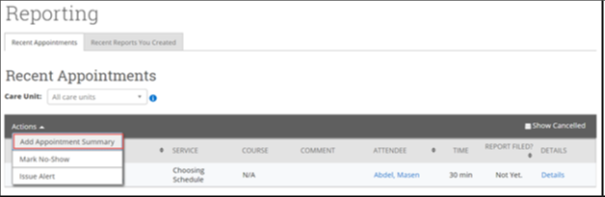
scheduled appointments. Add Appointment Summary is an option in the Actions drop-down menu throughout
the platform. The easiest way to access your appointments is from your Staff Home page. Under the Students tab
on Staff Home, scroll down and find your Recent Appointments. From this section, you can click on a student and
select Add Appointment Summary from the Actions drop-down menu. You can also access this section from the
Upcoming Appointments tab of Staff Home.
Note: It is important to always create Appointment Summary Reports from the scheduled appointment itself,
rather than ad-hoc, to ensure the Summary Report is tied to that specific appointment.
For Drop-in Appointments: There are several different ways to create an ad-hoc Appointment Summary Report
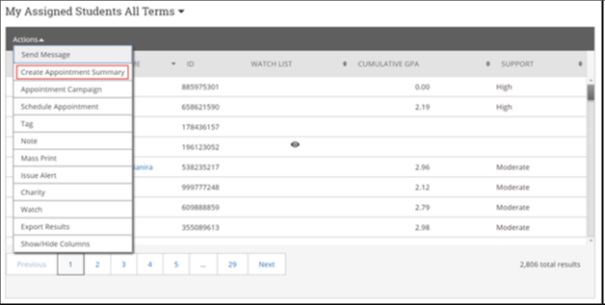
for walk-in appointments. Create Appointment Summary is an option in the Actions drop-down menu
throughout the platform. The easiest way to create an ad-hoc Appointment Summary Report for a walk-in
appointment is from Staff Home or a student profile. Under the Students tab of Staff Home, find the specific
student in your My Assigned Students section, or click the drop-down to find the student from one of your saved
lists. From this section, you can click on a student and select Create Appointment Summary from the Actions drop
down. This will create an Appointment Summary and add that appointment to your calendar in the past.
Documenting an Advising Interaction
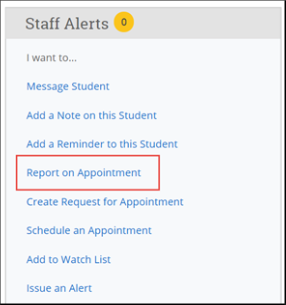
You can also create an ad hoc Appointment Summary Report from a student’s profile page. Navigate360 to that
specific student’s profile and click Report on Appointment from the Actions menu on the right. This will create an
Appointment Summary and add that appointment to your calendar in the past.
 Reminder: When creating an ad-hoc
Appointment Summary Report to track
drop-in appointments, the Navigate360
platform will create the relevant
appointment on your calendar for the date
and time you selected in the past. Creating
that appointment helps our system keep
track of all appointments happening with
students, regardless of whether they were
scheduled or walk-ins. If you sync your
professional calendar to the Navigate360
platform, this appointment created in the past will also sync to that calendar.
For No-Show Appointments: The
primary way to mark a student as a no-show
for a scheduled appointment is from
Staff Home. On the Students tab, scroll
down and find your Recent Appointments.
From this section, you can click on a
student and select Mark No-Show from
the Actions drop down. You can also access
this section from the Upcoming
Appointments tab of your homepage.
Marking a student as a no-show still adds a
Summary Report to the appointment. The
only difference is that the box next to the
student’s name called Attended will not be
checked. See the screenshot below.
Important Note: Any information you enter into Navigate360 pertaining to a
student becomes a part of their official student record and may be subpoenaed by
that student, as outlined in the Family Educational Rights and Privacy Act (FERPA).